Showing posts with label DIY. Show all posts

Denim and Navy.

June 30, 2013

My two "denim" skirts in light and dark wash have arrived earlier this week! The skirts are so flattering to my legs. REALLY. They cover the largest part of your thighs and they can be worn mid/high waisted (I wore mine mid waisted, else it would be too short). The skirts are actually of cotton material, but they are really thick and apt for Singapore's weather. Got them off an Instashop at only $13.00 each.
Paired it with my Track & Field shirt the other day. (see how my legs look so thin, but they aren't in real life). I have bigger thighs due to track and field T_T. But oh well, I'm trying to cut down my muscle mass in my thighs and train up other areas.

I paired the above outfit with my all-time favourite Taiwan trainers (which look a lot like Vans). But they are now in super horrible state, its 2.5 years old already.

So I went shoe hunting in hopes in getting one that is very similar. Went to Royal Sporting House, saw KEDS but they were all in weird designs or do not come in my size. Looked at other brands but they were way off my budget.

So i decided to try New Look (I went to Changi City Point before Tampines Mall and Tampines 1), and I was so thrilled to find these. They come in Black, Maroon, Navy and Red (brighter than Maroon). Thank goodness they still had my size.

I was thinking how should I lace my trainers - i usually do bar lace like "=" all the way. But I thought it was too boring and that it would have a lot of excess of the shoelaces. So I came up with the following method: Feminising your Trainers. I have not seen this anywhere online yet, usually I see the other quirky lace methods, but they require 4 lace holes.

This method would best work for 3-holed shoes and when you have excess of shoelaces when you do normal lacing. & for those who wants a little bit of feminism in your trainers!


This is how my trainers look like now.


That's all I have! Enjoy lacing up your shoes!

Tutorial: Tricks to Getting White Background

June 3, 2013

Ever since many people started using #brenoverlays and following @brenwho on Instagram, nevertheless, people yearn to achieve that all-white background for their photos. I have been using white background since then too and some of you must be wondering what sorcery did I use.

The fact is, I CHEATED all of you! Neither is my phone camera awesome nor do I have awesome photography skills (I use an iPhone 4 not even a 4S or 5).

Before I start cheating you, check that you have these apps installed on your smart-gadgets (I don't care what you use):

& any other editor app - I recommend beauty apps to smoothen and brighten your images

Preparing your INSTANT whitebackground

1. Open Up Whitagram


2. Screenshot this when Whitagram finish loading/opens up.

3. Go to your photo gallery, Crop the white square portion & Save it!

Tips when taking photos of your objects

1. Try to find white backgrounds such using these:
A White Paper Bag - Available at Daiso in various sizes
A White Envelope - Available at most Stationery Shops

 Drawing Paper - I used leftovers from my Secondary School Days

*try not to use normal a4 printing paper, unless it is the thicker kind of paper so it won't become translucent after lighting.

Getting That White Background


1. Make sure you have already smoothen/brighten your photos till the original background is as close to or equals to total whiteness - #FFFFFF

2. Open PicsArt, Select 'PHOTO' & 'Gallery'


3. Load the Cropped White Background (from Whitagram)
4. Select 'Add' on right-bottom corner


5. Select 'Gallery' & Load the photo you have edited/taken


6. Select that star icon for SHAPE crop. Since I took photo of the plate, I'm using the elliptical crop.
7. Adjust the size of how big you want it to be etc

     
Wala~ It's done!

 *WHAT IF after editing, & your background is still too dark?

-Hardwork is needed.

1. Load your photo.
2. Select the scissor icon - that's the free crop function


3. Select the brush tool and the size.
4. Zoom in/and make sure the areas you want to remain is covered in RED (by the brush tool)


& That's It! You can get similar outcomes!

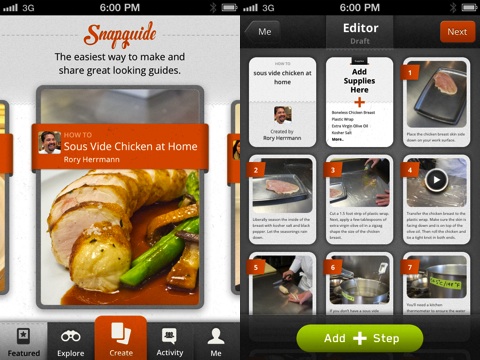
Snapguide! & Creamy Macaroni with Mushrooms

March 9, 2013


Love to bake / sew / cook / draw and always wanted to share with the people around you your fabulous or quick ways to get things done? 

Isn't it a hassle to explain to people step-by-step after transferring photos onto your desktop/ laptop ?

Forget about this conventional way with Snapguide ! 

I'm very sure almost everyone has a smartphone or an ipad/itouch right? Download Snapguide now! (I'm not sure if android has it yet), but its FREE on Apple App Store!

You can now simply snap photos/ record videos with your mobile devices while cooking/ baking.. or maybe ask your friend or family to help you with it. Next, there is SO MANY photo editor apps too! So edit your photos and upload to Snapguide !

& you just need to caption your photos and indicate the ingredients or materials used in your guide! 


Photo from Google

ISN'T IT EASY? In minutes, you can publish your very own guides!

I've just attempted Creamy Macaroni with Mushrooms all by myself and my brain juices! I wanted something quick and easy yet TASTY! Guide is shown below! It serves only one! So, if you are home alone or only one awake in the middle of the night wanting to whip up a quick meal this is the one!

Click on "Supplies" to see list of ingredients!

D-I-Y : Braided Bracelet w/ Color Pop Beads

October 8, 2012

Back from Hong Kong last night. This post is meant to keep you busy for the time being.


Step 1: Simple grab felt like "strings". Make sure you have 3 of them (any color). Mine was from an old necklace I had, and I just snipped them up into three portions.

Step 2: Braid them like how you would braid your own hair. *just remember to 'fold' in the side strands when overlapping*

Step 3: Get a strand of long thin thread (any color). I used the ones previously from making the pouch. I have tonnes of them left.

  (Front)

Step 4: Put a bead color of your choice through the needle and thread. Go through the gaps between the braided bracelet.

( Back )

Above 2 photos show how you should thread through the bracelet.

Step 6: Get some tiny small metal ring and hook and attached to the ends. You can use a pair of pliers to help you


DONE !!!


There you have it, your very own bracelet with your favourite beads. You can also do it without the beads but with varied colors for felt strings.


Go & have fun experimenting and doing your bracelet for yourself or for a friend or as a gift !

Meanwhile, I'll have to edit and sift through my Hong Kong Trip Photos. Might have 2 posts for it. One for hauls and one for some of the places I went. Sounds good?

D-I-Y : Floral Pouch

October 4, 2012

As promised. Floral Pouch Tutorial ! But as you're reading this post, I'm probably on board the plane or already in Hong Kong!


Materials that you need: Cloth, Zipper, Thread, Lace (optional). I got ALL of these from Daiso!


Tutorial starting ~


Hopefully you understood my instructions. I'm bad at it, I'm better at demo-ing.


The inner layer. Smooth and nice to touch. Un-see the ugly stitching please. 


Lace Details.

Zipper success ! 


This was how mine looked like after it's done. It's for my mum by the way. Her birthday is round the corner (next week). She's the one who taught me how to sew simple drawstring pouches that my brother and I used to put our daily allowance in back in the primary school days.

If you're following me on instagram, you would have seen this:


Coming soon. It's a super easy & simple one. Able to complete within an hour or two. Shall post it up soon ! Meanwhile have fun sewing your own unique pouch!

D-I-Y : Fruit Salad

September 16, 2012


Forget about your ice creams! Have something healthier instead - FRUIT SALAD. Can be served as a meal (breakfast) or dessert !


1. Choose your choice of fruits. ( I chosed Apple, Pear, Orange & Lemon )  

Tip: 
The more fruits you choose, the bigger the serving & healthier it gets.


2.  Dice all your fruits. 
Tip: 
Soak the cut fruits in salt or sugar solution (salt/sugar + water ) to prevent oxidation or browning. Not your orange / lemon of course.

 
3. Prepare dressing for your fruit salad. I squeezed lemon and orange for their juice added Honey. Make sure you stir & mix well !

My recipe: 4-5 Slices of Lemon, 2 small wedges of Orange, 1 Teaspoon of Manuka Honey.


4. [Optional] Add some toppings ! I chose Dried Kiwi (added in too much) & Cashew Nuts with a little bit of crushed RitterSport Chocolate. 

Tip: 
For healthier option, add in mixed nuts or berries!


Coming soon... next month's (October) D-I-Y post ! See my instagram for photos and process of the Floral Pouch I finished yesterday.


Keep reading ~ Bye folks. That's all ! Have a great Sunday.
Back to Top